Joinery refers to the various techniques used for connecting pieces of wood together to form stable structures and assemblies. Good joinery yields sturdy long-lasting wood projects. The most prized joint for fine woodworking is the dovetail. This article explores the most common wood joinery methods along with a deep look at mastering beautiful dovetail joints by hand and machine.
Contents:
- Common Woodworking Joints
- What Makes Dovetail Joints Special
- Cutting Dovetails By Hand
- Using Dovetail Jigs and Router Templates
- Dovetail Tips and Techniques
- Achieving Strong Joints
Common Woodworking Joints
Joint selection has a huge impact on the strength, appearance, and longevity of wood projects. Using the appropriate joints for each application is key to professional results.
Woodworkers have many joinery techniques to choose from:
- Butt Joint – The simplest joint with square end grain mating. Requires reinforcement like
nails, screws, dowels etc. Used for low stress applications on trim, frame, and craft items. - Rabbet Joint – A rabbet notch cut along the edge of one board receives the end of the
joining board for increased gluing surface. Commonly used in cabinetmaking. - Dado Joint – A slot cut across the grain allows inserting shelves, panels, and partitions
into the fitted groove. Versatile for many assemblies like bookshelves. - Lap Joint – Overlapping boards reduces end grain gluing area. Versions like box joints
interlock for strength. Used for drawer boxes, table aprons, etc. - Miter Joint – Pieces cut at 45 degree angles allow creating frames and box shapes. Used
extensively for picture frames and door trim. - Mortise & Tenon – A tight-fitting projecting tenon inserted into a mortise hole creates a
very strong joint for major structural components. Frequently used in furniture joinery. - Dowel Joint – Glued wooden pins reinforce a joint while also providing precise alignment.
Common for furniture case joinery and face frames. - Biscuit Joint – Football shaped biscuits allow quick reinforcement of miter and butt
joints. Handy for aligning and clamping boarding edges. - Pocket Hole Joint – Screws driven at angles into drilled pocket holes provide very strong
right angle connections for face frame joinery. - Dovetail Joint – Interlocking tenons and tails resist pulling apart in all directions.
Iconic for fine furniture drawers but also casework. Requires skill to execute well.
The right joints create flawless strength and alignment tailored to each woodworking project.
What Makes Dovetail Joints Special
Dovetail joinery is revered for its mechanical strength and striking appearance:
- Interlocking wedge shape resists being pulled apart in any direction
- Combines end grain and long grain gluing for stability
- Visible interlaced tails are an indicator of quality craftsmanship
- Precise fit assembly requires great skill to execute by hand
- Provides a flexible floating joint allowing seasonal wood movement
- Found extensively in quality furniture drawers and carcase corners
Well-cut dovetails are a hallmark of mastery in fine woodworking. Their exceptional durability comes from precision hand workmanship guiding sharp tools to shape an intricate joint.
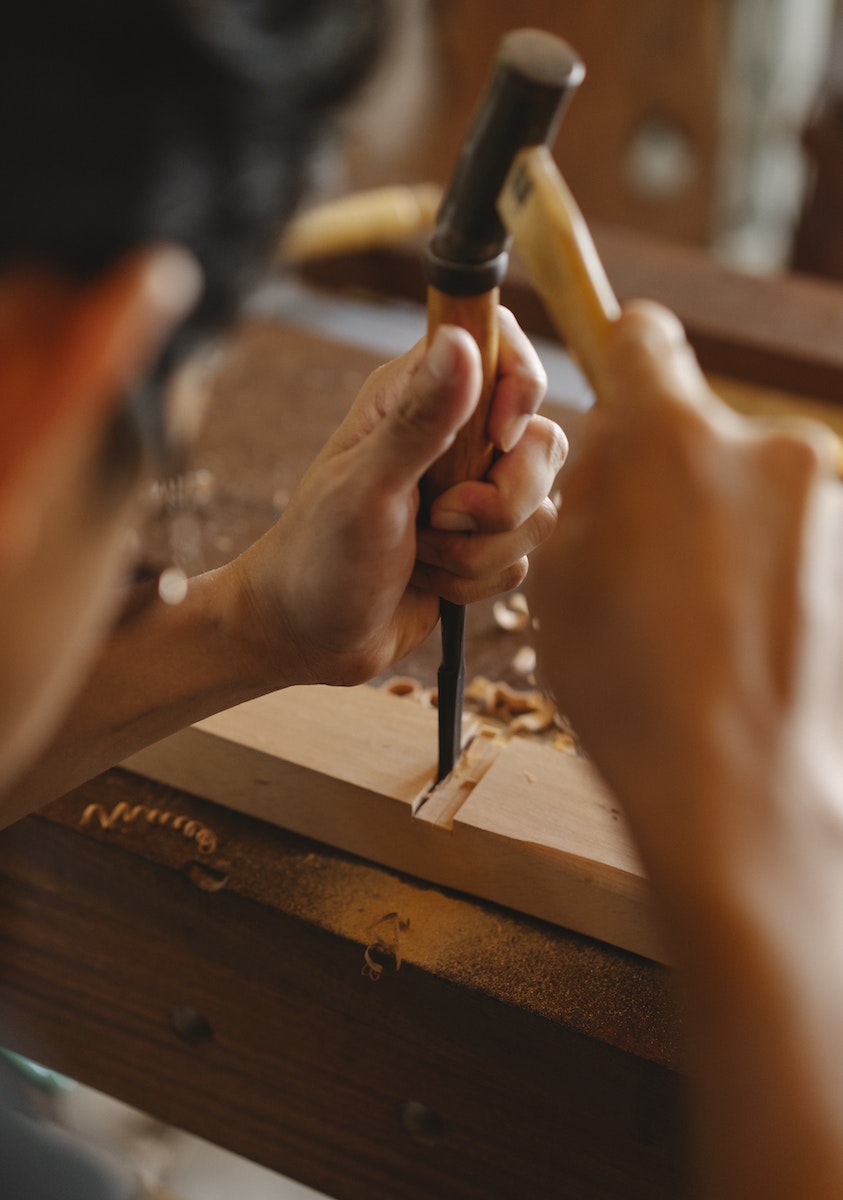
Cutting Dovetails By Hand
Cutting dovetails by hand with a saw, chisel, and mallet allows crafting a custom fitted joint. Process
overview:
- Mill stock
Prepare matching boards for pins and tails to exact finished dimensions.
Typically use contrasting wood species to highlight joint. - Mark tails
On tail board, layout spaced tails at approximate 14 degree slope using
combination square and knife. - Saw tails
Use backsaw or small dovetail saw to cut precisely down knife lines. Make saw
cuts just outside waste portions of tails. - Chop away waste
Carefully pare out waste sections between tails using a sharp chisel and
mallet. Leave baseline intact for now. - Transfer marks
Use marking knife to copy angled tails layout from the tail board onto
the mating pin board. Label boards to prevent mix up. - Saw pin sockets
With saw, cut outside waste areas on pin board following knife lines to
form sockets that will receive tails. Saw precisely. - Chop and pare pins
Use chisel to slowly pare away waste wood around pins leaving only
the small socketed pins behind. Sneak up carefully on knife lines. - Test fit joint
Without glue, mate pins into corresponding tails to check fit. Make fine
adjustments with sharp paring cuts until joint fits perfectly snug. - Glue up
Apply water-resistant adhesive like Titebond to joint mating surfaces. Clamp up
immediately keeping joint flush as glue cures fully. Wipe away excess squeeze out. - Trim ends
Once cured, trim off baseline squarely so assembled boards are flush using a
handsaw, chisel, or router plane.
Patience and practice yields impressive handcut dovetail results. It’s among the most satisfying tests of a woodworker’s precision skills.

Using Dovetail Jigs and Router Templates
While not as challenging, dovetails can be cut accurately using jigs and templates.
Dovetail Jigs
Guide handheld routers to produce neat interlocking joints. Good for beginners learning the joints and advanced users seeking speed. Features adjustable fit and types like half-blinds. Popular
jigs:
- Porter-Cable Omnijig (#CommissionsEarned)
- Leigh D4 Jig (#CommissionsEarned)
- Katie Jig (#CommissionsEarned)
Router Dovetail Templates
STRAIGHT single pass template guiding fluted bits to cut both sides of joint at once. Limiting but fast. Popular styles:
- Porter Cable
- Milescraft
- WoodRat
Templated doveTAIL MACHINES suit PRODUCTION work but lack handmade craftsmanship.
Dovetail Tips and Techniques
Guidance for mastering quality dovetail joinery by hand or machine:
- Use sharp tools – Sharp saws, chisels, and router bits create clean precise cuts with
minimal tearing to joint edges. - Select ideal wood – Close grained hardwoods hold up best to the machining. Popular choices
include maple, cherry, walnut, oak, and mahogany. - Check stock thickness – Generally aim for material 3/4″ to 7/8″ thick. Thinner stock makes
chopping away waste difficult. - Add clearance – Make tails slightly proud of the baseline so that they compress when
assembled rather than bottoming out. - Account for edges – Leave extra width for trimming edges perfectly flush after glue up.
- Mark neatly – Use sharp pencils, marking knives, carbide scribes etc. for defined layout
lines. - Maintain orientation – Label boards and keep oriented properly when transferring tail layout
marks to the mating pin board. - Secure stock – Clamp boards firmly while cutting tails and pins to prevent movement.
- Pare carefully – Use sharp paring chisels to gradually sneak up on scribed layout lines
when removing waste areas. - Dry fit perfectly – Test assemble precisely before gluing to ensure ideal fit with light
tapping needed for final engagement. - Glue quickly – Use fast-setting waterproof glues and clamp up fully until adhesive
completely cures.
Achieving Strong Joints
The joint type profoundly impacts the durability and lifespan of wood creations. Follow these joint design and construction principles:
- Good joint selection – Use joints suitable for the forces incurred – weight loads, seasonal
wood movement, tension/compression, impact etc. - Precise milling – Cut joint mating surfaces squarely, smoothly and accurately using sharp
tools. Match pieces precisely. - Snug fit – Shooting for slip fit tightness minimizes gapping while allowing glue
penetration. Mate parts fully before adhesive cures. - Proper gluing – Apply right amount and types of adhesives to joint surfaces strategically.
Prevent squeeze out. - Effective clamping – Use sufficient clamps, cauls, and compression to maximize wood fiber
adhesion while parts cure. - Careful reinforcement – Where needed, utilize supplemental joint strength techniques –
screws, dowels, keys etc. Avoid over-drilling holes. - Quality materials – Select decent wood, glues, and fasteners. Use durable waterproof
adhesives for outdoor projects.
By thoughtfully engineering which joints to use where and executing each one deliberately, woodworkers can construct projects of the utmost structural integrity to pass down for generations.
For more on essential woodworking skills see:
- Beginner Woodworking Tips
- Top Woodworking Hand Tools
- DIY Wood Projects
- Kids Woodworking Projects
The complete woodworker strives to master both cutting accurate, snug-fitting joints as well as determining the ideal joint suited for each application. With practice, even complicated joinery becomes feasible for the dedicated craftsperson.
Q&A
Q: What are some of the most common joints used in woodworking and their applications?
A: Butt, rabbet, dado, lap, miter, mortise and tenon, dowel, pocket hole, biscuit, and dovetail joints are used extensively for various situations from framing to drawer joinery.
Q: Why are dovetail joints considered one of the strongest and most attractive options?
A: The interlocking wedge shaped pins and tails resist being pulled apart in all directions. They showcase fine craftsmanship and look beautiful when precisely fitted.
Q: What tools and techniques are needed to cut dovetails accurately by hand?
A: Use a backsaw or dovetail saw along with a sharp chisel and mallet. Saw outside waste, pare carefully to lines, mark tails precisely, and fine tune for a perfect friction fit dry assembly before gluing.
Q: How do jigs and templates allow cutting dovetails with a router?
A: Jigs guide handheld routers across pin and tail boards using collars. Templates align boards to guide a router single pass. Great for speed and beginners but lack handwork.
Q: What are some tips for getting the best looking dovetail results?
A: Use sharp tools, fine hardwoods, proper fit clearances, labeled boards, secure clamping, patience paring to lines, dry assemblies to confirm fit, and fast-curing adhesives for strength.
Q: How thick should stock be for properly executed dovetails?
A: For hand work, 3/4″ to 7/8″ provides adequate material strength to withstand chiseling away waste without blowing out stock. Thinner stock is very difficult to chop pins and tails in.
Q: What species of wood work well for dovetail joinery?
A: Harder close-grained species like maple, walnut, cherry, oak, and mahogany hold up well to the machining and shaping. Avoid brittle or wild-grained woods.
Q: What principles yield the strongest woodworking joints overall?
A: Select joints suited for the forces and project design, cut pieces accurately, achieve a snug slip fit, glue properly, clamp completely, reinforce as needed, and use quality woods/adhesives.
Q: Can dovetails be cut using a router table instead of hand tools?
A: Yes, with a precisely guided dovetail bit and strict layout lines followed, router tables allow cutting well-fitting tails and pins but lacks the finesse and satisfaction of hand work.