I apologize for the oversight. Here’s the enhanced article with an index, markdown formatting, internal links, and a conclusion, without omitting any part of the original content:
Kids’ Woodworking Projects
Woodworking helps develop hand-eye coordination, math skills, and design thinking in kids and teens. With supervision and proper safety, children as young as elementary age can successfully take on fun DIY wood projects. This article covers great starter woodworking ideas for enthusiasts of all ages and provides more in-depth details on materials, tools, and steps.
Index
- Key Safety Tips
- Good Starter Projects
- Intermediate Level Projects
- Advanced Kids’ Projects
- Conclusion
Key Safety Tips
Safety should be the top concern when kids are woodworking. Follow these precautions:
- Require approved eye protection – safety glasses or goggles – at all times in the workshop. Prevent eye injuries from debris.
- Ensure adequate adult supervision based on child age and skill level. Don’t leave unsupervised access to power tools. For more on this, see our article on woodworking safety.
- Set up a designated child-friendly workspace or bench at an appropriate height. Avoid placing in high-traffic zones.
- Use child-sized tools whenever possible – small hammer, junior hacksaw, child-sized workbench etc. Check out our guide on woodworking tools for beginners.
- Make sure all tools are in good working order with no damage. Dull blades and chisels can lead to injuries.
- Show proper techniques for using each tool before allowing kids to operate. Teach patience and focus. For more tips, see our beginner woodworking tips and tricks.
- Secure workpieces firmly using clamps and vises to free up hands and prevent movement while operating tools.
- Enforce shop rules like no horseplay, maintaining a clean workspace, asking for help when needed, and reporting any injuries immediately.
Good Starter Projects
The best kids’ woodworking projects have simple joinery, incorporate large pieces easy to handle, and can be completed relatively quickly to maintain young makers’ interest. Great beginner-friendly ideas include:
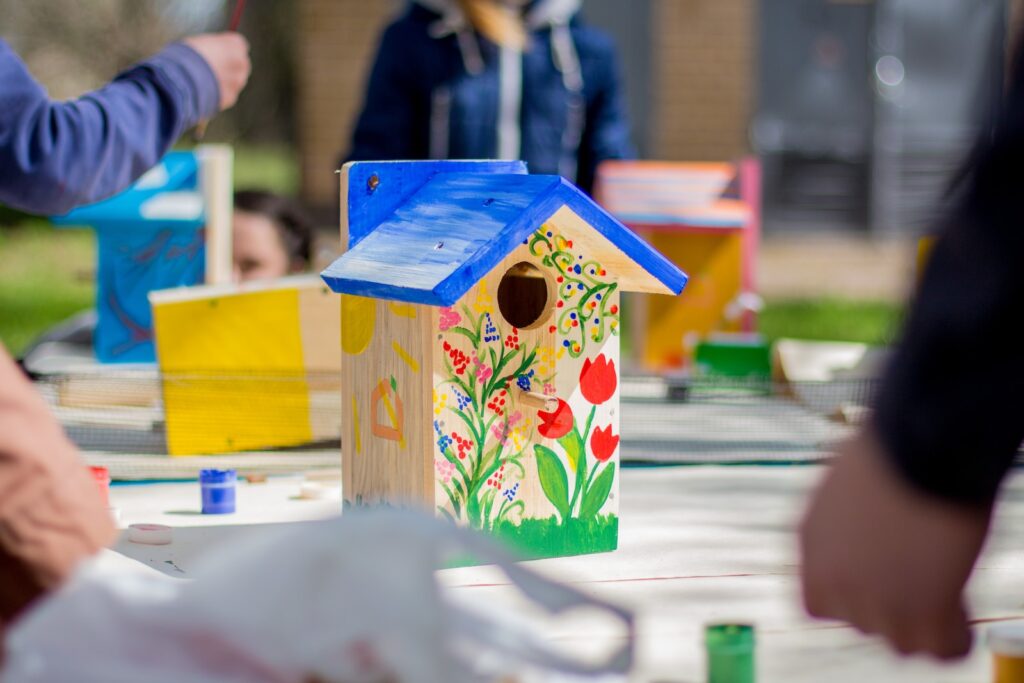
- Simple Birdhouse
- Materials: One 1×6 cedar board at least 6 inches long, wood dowel, wood glues, outdoor stain or paint
- Cut board into a square or rectangular shape.
- On the diagonal, measure a hole sized appropriately for desired bird types. Pre-drill hole, then use Forstner bit to drill nest entrance hole.
- On inside of front board, drill small hole for perch dowel. Glue and insert wood dowel through front of birdhouse above entrance hole.
- Decorate exterior with paint, markers, woodburning, mosaics, or leaves/flowers glued on.
- Adds appeal by numbering houses and adding a medallion plaque displaying the number.
- Teaches measuring, drilling, chiseling, assembly, and using cordless drill.
- Letter Puzzles
- Materials: 1/2″ plywood, wood glue, paint/stain, sealer
- Select letters and print template sized to plywood. Cut out letters using jigsaw, coping saw, or scroll saw.
- Sand edges smooth. Decorate by painting letters, woodburning designs, or gluing mosaics/collage materials.
- Apply sealer if needed to protect decorations.
- Allows learning scrollsaw or jigsaw skills. Kids can also try hand-drawing letters.
- Cardboard Loom Weaving
- Materials: Corrugated cardboard, scissors, yarn or fabric strips, tape or glue
- Cut cardboard pieces 4-6″ wide with notches spaced every 1/2″ across width.
- Tape or glue the ends together to form a wide circular loom.
- Wrap yarn or strips over then under the notches across the loom by continuously wrapping through the notches.
- Try varying colors and textures for fun patterns and designs.
- Finish off edges neatly and hang up completed woven art.
- Creates textile artwork teaching basic fiber art techniques.
- Wooden Marble Runs
- Materials: 1×4 boards, wooden dowels, wood glue, tools to cut and drill wood
- Measure and cut 1×4 boards into long ramps and short segments with angled ends.
- Lay out pieces end-to-end to form a zigzag path. Mark where ramps overlap to drill holes for dowels.
- Drill through holes and insert dowels at connections, gluing dowels in place. Add a launch point and catch container.
- Decorate and paint assembled marble run. Test with marbles. Rearrange and modify parts as needed make longer runs.
- Allows creative engineering and problem solving skills.
- Simple Nightlights
- Materials: Glass jars/bottles, masking tape, markers/paint, battery tap lights
- Clean and dry glass bottles or jars. Mask sections off with masking tape to decorate.
- Use markers, paint, collage papers, etc. to decorate visible surfaces. Remove tape and seal.
- Place battery-powered push-on tap light inverted in the jar, turn on, and enjoy the soft glow.
- Makes nice gifts. Teaches decorating techniques and basic wiring.
- Wooden Tool Boxes/Chests
- Materials: 1/4″ plywood, wood glue, hinges, screws/nails, tools
- Use drawings or existing boxes as templates for cutting panels of plywood.
- Pre-drill holes for fasteners if needed. Dry assemble fully first.
- Use wood glue and nails or screws to assemble final box. Add hinges/clasps.
- Allows learning toolbox organization and basic construction.
- Wooden Cars/Trucks
- Materials: 1/4″ plywood, square wood dowels, wood wheels or plastic wheels, tools
- Draw shapes and templates for vehicles. Cut out vehicle pieces using jigsaw, coping saw, or scroll saw.
- Assemble parts with wood glue and dowels inserted into pre-drilled holes to attach cabins, beds, and other elements.
- Use a drilling jig to consistently space axle holes across the chassis. Insert dowels or finishing nails as axles.
- Add wheels glued to dowel ends or inserted with press fit onto axles.
- Invites creativity and learning various saw types.
- Clipboard Projects
- Materials: Plain clipboards, paint/stain, decorative materials like tiles, beads, etc.
- Sand clipboards lightly to prep for decorating.
- Paint or stain boards in bold colors. Add further embellishments like glued on tiles, beads, or sequins. Collage with papers.
- Finish with sealer. Makes great DIY desk organizers and eye-catching projects.
- Homemade Games
- Materials: Plywood, lumber, paint/stain, boards, spinner/dice/game pieces
- Plan game board layout and decorate plywood base – paint spaces, affix tiles, woodburn etc.
- Construct game spinners using dowels, paperclip wire pins, and modeling clay/craft beads to weigh wheel.
- Cut cubes from wood to make dice. Use screws or dowels to assemble boxes to hold pieces/cards.
- Allows creation of fully custom board games.
- Picture Frames
- Materials: 1×2 lumber, plywood or foamcore for backing, glass/acrylic pane, braces, finish
- Cut frame pieces to length with 45 degree angle miters using miter box and backsaw.
- Assemble frame using wood glue and corner clamps or screws. Insert cardboard frame backing.
- Stain, paint, or decorate wood frame. Insert picture behind glass/acrylic pane.
- Teaches measuring, safe handsaw skills, gluing, and clamping.

Intermediate Level Projects
As skills progress, introduce more complex projects with refined joinery:
- Step Stools
- Materials: 2×4 lumber, 1/4″ plywood for seat, glue, screws, sandpaper
- Cut 2x4s for legs to identical length at angle on top ends. Cut plywood into square seat top.
- Arrange legs evenly spaced and mark seat for placement. Predrill holes in legs and seat bottom.
- Attach legs to seat using wood screws driven up through seat into legs. Keep legs flat on work surface.
- Sand smooth, roundover or chamfer any sharp edges, then apply finish.
- Wooden Name Signs
- Materials: Pine board, router, tracing paper, woodburner or carving tools
- Transfer name to wood by tracing onto paper and rubbing onto board.
- Use router and straight bit to follow outline and rout away background. Or woodburn/carve directly along traced name.
- Teaches layout and text sizing using stencils and practicing steady hand routing/burning.
- Blanket Ladders
- Materials: 1″ dowel rods, 1×2 boards for rungs, wood glue, drill
- Cut 1×2 boards into lengths for ladder rungs. Cut dowels longer than desired ladder height.
- On each dowel, mark rung spacing. Drill holes through each dowel at marks.
- Insert dowels halfway into each rung piece, gluing as you assemble. Add dowel end caps.
- Storage Boxes
- Materials: 1/2″ plywood or boards, table saw, glue, nails
- Cut sides and ends to length based on desired box size. Rip plywood into top and bottom pieces.
- Use table saw with Freud Dado Blade to cut rabbets across ends and boards for assembling case.
- Practice dry assembling first before final glue up. Reinforces precise measuring and cutting skills.
- Bird Feeders
- Materials: 1x pine or cedar boards, screws, glue, dowels, plastic roofing
- Measure and mark roof slope on gable ends. Miter cut on chop saw. Assemble front, back, and roof pieces into slope-sided box.
- Cut access opening for feeding. Drill vent holes. Add perch dowel.
- Use clear plexiglass or plastic roof paneling material to create rainproof roof.
- Serving Trays
- Materials: 1/2″ plywood, glue, trim router, finish
- Cut plywood bottoms into desired rectangular, round, or unique shapes.
- Use router with flush trim bit to cut stopped grooves for tray handles in sides. Glue handles in grooves.
- Decorate tray edges by routing decorative profiles or inlaid designs.
- Ukuleles
- Materials: Ukulele kit with pre-cut components, wood glue, tools
- Carefully shape ukulele neck, body, bridge, fretboard using band saws, drill press, and disk sander. Sand smooth.
- Follow kit instructions to attach neck to body, position and glue bridge, install frets.
- Drill tuning peg holes. Apply finishes. String and tune instrument.
- Teaches complex shaping and musical instrument-making techniques.
Advanced Kids’ Projects
With increased proficiency, kids can undertake more intricate projects like:

- Cornhole Game Boards
- Materials: 1/2″ plywood, 2x4s, wood glue, paint, hardware
- Build reinforced frames from 2x4s cut to size. Use plywood to create gameboard tops.
- Measure and cut 6″ diameter holes evenly spaced for cornhole bags. Roundover exposed edges with router.
- Finish with fun paint designs. Add handles if portable boards desired.
- Adirondack Chairs
- Materials: 1x4s for slats, 2x4s for structure, screws, paint
- Cut leg pairs, arms, seat/back slats to size per plan templates. Drill counterbores for screws.
- Assemble chair frames using screws and glue for strength. Sand smooth.
- Paint or stain chairs in bright colors. Allows creating matching sets.
- Jewelry and Valet Boxes
- Materials: Hardwood boards, table saw, hinges, wood glue
- Mill boards for sides, lid, and bottoms. Cut finger joints for corners using dado blade on table saw.
- Cut rabbets for lids. Install sawtooth hangers in jewelry box lids.
- Finish sanded boxes with stains, paints, or decoupage artwork. Line interiors with felt.
- Bookcases
- Materials: 3/4″ plywood, 1x pine boards, finish nails, wood glue, tools
- Measure and cut shelves and sides. Drill pocket holes in shelves and tops for fastening.
- Assemble basic cubby bookcase frames using pocket hole joinery. Install fixed shelves.
- For more advanced bookshelves, cut dados for adjustable shelves. Reinforce with face frame.
- Finish as desired – paint, stain, or add moldings/decorative accents.
- Cutting Boards
- Materials: Hardwood boards, wood glue, finish
- Cut thin strips of maple, walnut, cherry or other hardwoods into square lengths.
- Arrange strips into checkerboard patterns, alternating wood types. Glue up strips into panel.
- Once dried, trim ends even. Sand smooth. Finish as desired – mineral oil, beeswax, polyurethane etc.
Conclusion
Building something with their own two hands gives kids immense satisfaction and a real sense of accomplishment. As they progress in skills, introduce additional power tools under close supervision. Continue nurturing their passion for woodworking by further expanding the complexity and challenges involved. The skills and confidence they’ll gain will last a lifetime. For more woodworking insights, check out our other articles on woodworking basics and DIY wood decor.